|
Overview |
[ back ] [ top ]
|
|
|
|
|
Exporting useful .rib Files |
[ back ] [ top ]
|
|
|
|

| 1. Set Shader and Texture names |
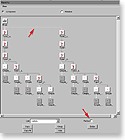
In Xfrog one can stick abitrary names to color and texture assignements (right picture). The .rib Exporter uses the Color Name as the name of the Shader assigned to a certain object. If a Texture Name ist also provided, it's passed to the Shader as
"texturename"
parameter. So the example on the right would result in the following rib Surface call:Surface "leaf" "texturename" ["cherry_leaf.tif"]Ensure that you choose the Texture Name that will result from the preprocessing steps described in the next Section and the Color Name matches the name of the shader you want to use (see the Shading Section). Be also sure to hit the Enter key after setting the names. Otherwise Xfrog doesn't apply the values you entered to the primitives!

| 2. Link ReUsing & Export |
This is more a note than a required step, but you should know about it. If you set a Link to be ReUsed in Xfrog, the RenderMan Export puts all objects from this link down the graph in it's own Archive. This will have some practical effects, because these Archives are loaded by the renderer only when needed and hopefully discarded when they are rendered completely. This will reduce the Memory Hit of your trees especially for REYES based Renderers like PRMan.
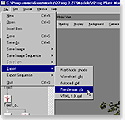
Once you completed setting up your model for export, you just have to select Export from the File Menu and Choose "RenderMan .rib" (right picture).
|
Texture Files |
[ back ] [ top ]
|
|
|
|
To make this tutorial work for every Renderer, the Files are converted to the Renderers preferred format.
For a special renderer some of the steps here may be unnecessary or can be avoided, but following them all ensures that you don't run into unexpected problems and will in almost every case improve performance.
I used Photoshop here, but you should be able to follow these steps with any other image editing program.
| 1. Create the Alpha Channel |
This step is only needed for the leaf textures, since the bark textures don't have an alpha channel.
The leaf .png images hold an alpha channel, but this channel is lost when one just saves as .tiff (perhaps programs other than Photoshop handle this case differently).
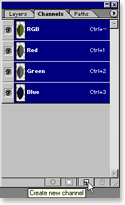
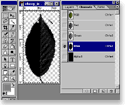
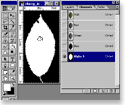
To create the new alpha channel, select the channels tab and Create a new channel (left picture). A new Alpha Channel appears. Now choose one of the color channels and select the empty area around the leaf using the Magic Wand Tool (upper right), Invert the selection, go back to the alpha channel and fill the selected area white (lower right picture). Perhaps you'll need to do some clean-up work at the borders of the alpha channel.
You should now flatten the image, since the transparency is no longer needed and this will save us from some headache later.
| 2. Resizing and filling empty areas |
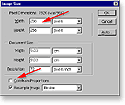
In some cases you may encounter problems with texturing in RenderMan when the image aspect ratio is not 1. Some renderers may try to maintain the aspect ratio in Texture space. To avoid this for sure, stretch the image so that it has the same resolution in both width and height direction. Ensure that you unchecked the "Constrain Proportions"-Checkbox (left picture). You'll probably want to set both values to the higher value (this is 256px for the leaf texture of the cherry tree).
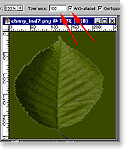
You'll also need to fill the empty area of the color channels with a solid color. This will prevent the leaf from having white borders after rendering, because the renderer may filter an area of the leaf texture larger than one pixel to prevent texture aliasing when the leafs are getting small in screen space. For the border of the leaf this will also include some pixels outside the actual screen leaf. In most cases some kind of green that somehow matches the overall leaf color will do, so just use the color picker to get a sample color of the leaf (perhaps with the "Sample Size" set to a higher value) and fill the empty area outside the leaf with this color, using "Anti-Aliasing" and "Tolerance" set to a reasonably high value (right picture).
At last just save the Images in .tiff format because that's the only format all RenderMan compliant renderers I know support.
| 3. Convert .tiff Images to the Renderers proprietary format |
The second step is to convert the texture files into the format your Renderer likes best. The easiest probably is to set up a small .rib File by hand, using the MakeTexture statement, like this one:
        MakeTexture "cherry_bark01_r.tif" "cherry_bark.tif" "periodic" "periodic" "gaussian" 2.0 2.0

        MakeTexture "cherry_leaf2.tif" "cherry_leaf.tif" "periodic" "periodic" "gaussian" 2.0 2.0
[ txmake.rib ]
This converts our cherry_bark01_r.tif and cherry_leaf2.tif created in Photoshop into the Renderers proprietary format. This is a special tiff flavour for RenderDotC and BMRT and the proprietary .tx format for PRMan. The first two parameters of the MakeTexture call are the input and output files respectively. Consult the RISpec 3.2 for the exact meaning of the other parameters.
In general RenderMan renderers also provide a command line tool to convert textures with, but the parameters may differ. If you'd prefer that method, you'll have to look that up in your renderers manual. Of course you'll need this texture conversion only once.
|
Writing Shaders |
[ back ] [ top ]
|
|
|
|
| 1. The Bark Shader |
This actually is the paintedplastic shader without modification. An example .rib call is:
Surface "bark" "texturename" ["cherry_bark.tif"]If you added Surface and Texture Names in Xfrog properly, this line is created by Xfrog automatically.
Important is only that the textures are tiled by the renderer, which is ensured by setting the tiling to periodic when making the texture. Otherwise the parts of the tree having texture coordinates falling out of the [0;1] range in one direction will appear black.
[ bark.sl ]
| 2. The Leaf Shader |
This also is basically the paintedplastic shader with some modifications to read the alpha channel of the texture file. An example .rib call is:
Surface "leaf" "texturename" ["cherry_leaf.tif"]If you added Surface and Texture Names in Xfrog properly, this line is created by Xfrog automatically.
There's one thing which is especially noteworthy, because it might cause problems. As you can see in the source below the texture filter kernel size is set to 0 for the alpha map. This is because the renderer would otherwise produce a smooth transparency transition at the borders of the leafs. This is a nice effect when thinking about Aliasing, but this tends to produce very many layers of transparency which can slow rendering down especially for very many leaves with the size of around one Pixel or below. The current solution may cause trouble because it tends to produce geometric aliasing. If that's an issue you might want to reset the kernel size to pixel size (by removing the
"width", 0.0 from
the texture call.[ leaf.sl ]
| 3. Extending the Shaders |
An extension which comes to mind quickly is adding some bump mapping. For closeups displacement mapping would be nice, too.
Another thing that's especially interesting when thinking of the leafs is Translucency. This effect is actually quite straighforward to implement with RenderMan, as long as the leafs don't have any thickness.
The last idea I want you to consider is just using a different illumination model. Very rough surfaces (like the bark) often have a diffuse reflection behaviour different from the lambert model, so enhancing the bark shader with something like the Oren/Nayar model for diffuse reflectors might be nice.
These are just some general Ideas and I perhaps implement them (and post them here), but if anyone of you is faster than me (not very difficult actually), he may want to share the shaders with the community. If that's the case, feel free to send me the shaders so that I can post them here (properly credited of course).
|
Final Rendering |
[ back ] [ top ]
|
|
|
|
| Including the Tree in your Scene |
In the general case you might want to add these trees to your scene, generated in a different program. You'll have to consult the Manual of your RenderMan Frontend (MTOR or whatever) on how to include RIB snippets into your scene. The best probably is to somehow attach a rib snippet to some kind of dummy object. This rib snippet will be a ReadArchive or Procedural call to include your tree .rib:
ReadArchive "myTree.rib"or
Procedural "DelayedReadArchive" ["myTree.rib"] [-1 1 -1 1 -1 1]The Procedural is the more intelligent way and you should prefer this if your renderer supports this feature. The six numbers at the end are a Bounding Volume. So you can let your renderer know where the object is stored and how big it is and if it's encountered sometime in the rendering process it is loaded. If you're happy perhaps the object is hidden behind some other object or is outside the viewing frustrum so it get's culled and is actually never loaded. To estimate the Size of the Bounding Volume, just have a look into your newly created .rib Archive. Somewhere at the beginning there's a line looking like this:
Bound -9.22869 6.65091 -6.79439 6.33618 -0.0370096 18.104That's the Bound of the whole Archive. Just copy and paste the values following the Bound statement into the last pair of braces of the Procedural Call.
| Note for MTOR Users |
Here's how you can add the tree to your scene using MTOR.
"RIB Boxes are a general means to enter arbitrary RIB into your scene. The contents of your RIB box are first substituted, using the standard TCL substitution mechanisms and then directly inserted into the RIB stream. You can even have a conditional RIB Box."We don't need any conditionals here, so something like...
return "ReadArchive \"mytree.rib\""...should do the job
Finally apply this slim appearance to a placeholder object in your Maya scene.

| Test Rendering |
If you don't have a RenderMan Frontend available you may do some test rendering with the file provided here. You'll just have to open it in a simple text editor and replace the archivename by the .rib file you generated with Xfrog and call the renderer with this file.
[ scene.rib ]

| A Note on Shadows |
Shadows are a powerful visual cue and do contribute a lot to the appearance especially of trees. Shadows are in most cases created either by Shadow Mapping or by Ray Tracing and there are some problems with both.
Shadow Maps are much faster and this is an very important argument especially for objects of high geometric complexity. RenderMan Renderers can create Depth Images which can then be used as a shadow map, but be aware, that the Depth Image File may ignore Opacity of objects so not only the leaf will cast shadows, but the whole Polygon it's made of. PRMan and RenderDotC usually don't have this problem. They ignore parts of objects with Opacity values lower that [1 1 1] in depth images. You can change the treshold with the implementation specific option
Option "limit" "ztreshold" [r g b]for both, PRMan and RenderDotC. BMRT doesn't seem to have this option, and so may other renderers. Look up the manual of your particular renderer for details. When you use Xfrog's leaf Primitive this whole issue is not a problem, but when the leaf is mapped onto a Polygon and cut out via opacity (as it is in our example) this may produce too large shadows.
When using RayTracing for Shadows (for example with BMRT) you shouldn't have this problem, because Ray Traced Shadows can easily account for transparency. But by default they often do not! You'll have to tell BMRT that it should evaluate the Shader for shadow Rays. You can do this by adding this attribute to the Object:
Attribute "render" "casts_shadows" ["shade"]and of course you'll have to enable shadow casting for the lights by setting:
Attribute "light" "shadows" ["on"]Here's a test file which add's these changes to the scene.rib from above.
[ shadscene.rib ]
| Beyond this tutorial |
Once you moved your trees to the RenderMan World, your possibilities to enhance their look are uncounted. Check out my RenderMan Section for more Information on RenderMan and Links to interesting pages dedicated to RenderMan Renderers and writing Shaders.
And of course I'm sure the whole community would be interested to have a look on your archivements so feel free to send in any pictures which were created with this tutorial as a starting point or any comments, enhancements, shaders, tips and whatever you'd like to share with the community.

|
Known Issues with certain RenderMan Renderers |
[ back ] [ top ]
|
|
|
|
| BMRT and Texture Coordinates |
Since in the RenderMan world it's common to have texture coordinates only in the Range [0;1], BMRT issues a warning when Texture Coordinates out of this range are passed to the renderer, but as long as the shader handles these cases well, this should not be a problem.
| RenderMan and Polygons |
When encountering problems due to Polygonal representation every RenderMan Guru will just tell you: "Don't use Polygons, they're evil". And they are right, but since XFrog uses Polygonal representation internally we have to deal with it now. What you just have to expect is sometimes poor and buggy Polygon support in RenderMan compliant renderers. For example it was a know issue for years that PRMan (the most used Special Effects renderer) is very slow on rendering triangles. I also encountered some problems with rendering large Polygon meshes with BMRT and RenderDotC, but the authors of both programs have announced better polygon support in future releases. The Polygon support of newer PRMan versions is stable as far as I know.
| DelayedReadArchive |
The new Xfrog RenderMan Export utilizes the "DelayedReadArchive" Procedural. This Procedural Call is not interpreted by all RenderMan compliant Renderers (especially older ones), because it's a rather new feature. The current Versions of PRMan and BMRT will work without complaints.
If you encounter problems related to this, you'll need to replace all Procedural calls by an ReadArchive call. As an example:
Procedural "DelayedReadArchive" ["Sour_CherryArchive/Tree2_copy1.rib"] [-7 6 -6 6 -0.02 15]...needs to be replaced by:
ReadArchive "Sour_CherryArchive/Tree2_copy1.rib"| The AIR Renderer |
If you want to have all the good things of RenderMan (Shading Language, Deferred Loading, etc.) and need really fast rendering you might want to check out AIR, a Renderer by SiteXGraphics (www.sitexgraphics.com). It's affordable, has all these neat features and is extremly fast on Polygons (REYES Renderers like PRMan and RenderDotC usually are slow on Polygons and Raytracing is always slow). The ideal Renderer for a huge bunch of trees...