Alpha Blending for Leaves
Timm Dapper (td@td-grafik.de)last change: (07/02/2002)
When using Image Maps with Alpha Channel to cut out leaf shapes from rectangular Polygons
one often gets an ugly border around the outline when using Plain Alpha.
This Document shows where this border comes from, and how this problem can be solved
using Premultiplied Alpha.
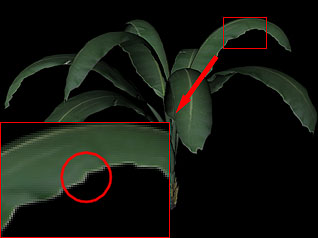
Here's where this ugly border comes from (Plain Alpha)...
The problem only arises at the pixels that have a color consisting of both background color (white in this case) and leaf color and an alpha value between 0 and 1. What happens there is the image color (which is a mix of background color and foreground color) is taken for a leaf in the foreground and blended with the color behind the leaf according to the alpha value. This is why this way of handling alpha is called unassociated alpha. Color and Alpha are handled completely differently from each other. The following is an illustration of what is happening at one of the border pixels:What the Texture stores
 |
What the Renderer makes of it
|
...and here's how to get rid of it (Premultiplied Alpha)
The thing we don't want to happen is that the background color of the picture shows up in the image. To get rid of the background color in the texture file the renderer basically needs to know what the background color is so it can remove it before using it in the Rendering Process. When working on the Pixels with an alpha between 0 and 1 the renderer could then just remove that color. This is especially easy to do with a black background, you could just divide the color by the alpha value to get the color without the background color blended in. Premultiplied alpha is commonly used by lots of applications (Photoshop and pretty much every compositing system) since it has been proposed eighteen years ago by Duff and Porter in [duff84]. The following shows how this works:What the Texture stores
|
What the Renderer makes of it
|
A different way of thinking about this is that you want to take the rendering background color and the original leaf color (not mixed with the texture background) and blend them according to the alpha value. To archive this you would take:
[rendering background color] * (1 - alpha) + [texture leaf color] * alpha
The latter is exactly what the texture file stores in the case of premultiplied alpha (this is also where the term comes from). The above formula is what is usually used to compute alpha blending in the case of transparent surfaces. The only thing the renderer needs to know is whether the texture has premultiplied alpha (in which case it would skip the multiplication with alpha). This is a standard tag in the tiff file format and most appicatins have a switch which lets you explicitly set whether a bitmap has plain or premultiplied alpha.
Let's compare this to what would have happened with plain alpha in this case:
|
Other advantages of premultiplied alpha which are less important here:
- With premultiplied alpha one can not just blend a foreground with a background color but also just add color. When alpha is zero but there is some color at that pixel it will just be added to the background color without making the background darker. This allows for example to add reflections on surfaces in post.
- It is computationally cheaper as it saves one multiply per layer per pixel which may be a concern for high resolution compositings and a large number of layers.
Disadvantages of premultiplied alpha:
- As the possible range of the alpha channel is limited to the maximum brighness of the color and thus can generally not use the full range of 255 grayscales there may be numerical precision errors arising from this, but this seems to be just a theoretical issue even for high end composition applications.
Terminology
Premultiplied Alpha is also known as Associated Alpha (in contrast to Unassociated Alpha).Other stuff:
- One may argue that you could just use a map without any grayscales in the alpha channel to get rid of this problem. This will not work in practice, as a rendering application will filter the texture (as this is the right thing to do) and this filtering step will reintroduce intermediate colors at the borders. In an extreme case a whole leaf may be smaller than one shading sample/pixel and the whole image will be integrated into one single color value.
- Another thing commonly proposed is using a midrange color or something close to the actual texture color. This will work well in some cases and not so well in others as it does not solve the problem. Problems will arise if the texture color changes a lot over the course of the leaf or if many different colors/shades occur in one texture. Sometimes leaf textures even include parts of twigs which can introduce completely different colors. Making up for all this is much more work than just converting to Premultiplied Alpha.
What we can do about it?
First of all: Premultiplied Alpha is not some rare esoteric special case. It has been around for nearly twenty years, has been acknowledged by all Graphics Professionals (Jim Blinn once called it the "One True Way"), is used by all Production houses and is the only clean way of getting rid of the ugly borders.
I'd expect more applications that don't give the user the choice to implicitly always assume that Premultiplied Alpha is used instead of Plain Alpha. One can safely assume that a package meant for professional use will support this.
Even if a certain package does not support it we just end up having the same border problem as we had before, it will not get worse
Creating Premultiplied Alpha TIFF Files with Photoshop 6.0
This description is made for photoshop 6.0, but it will most probably also work with other versions even though certain options may be placed somewhere else or look a little differently.
| 1. Prepare Image | |
 |
Make sure the image uses Photoshop internal transparency and do not apply alpha as an additional channel. The alpha transparency has to show up in the image like shown to the left. Only if you use the internal transparency Photoshop will set the Premultiplied Alpha Tag in the TIFF File. This also gives you a good preview of how alpha transparency will work later on in the target application, as premultiplied alpha is exactly what Photoshop uses internally. |
| 2. Make sure Advanced TIFF save options are enabled | ||
 |
Photoshop doesn't give you all the more advanced TIFF Saving Options by default, but you have to enable them manually. To do this select 'Preferences' from the 'Edit' Menu and then 'Saving Files...' from the SubMenu. In the Preferences Dialog now make sure that 'Enable Advanced TIFF save options' is checked. |
 |
| 3. Save image | |||
 |
 |
Now you can just choose 'Save As...' from the 'File' Menu, select a filename and hit Save as usual. Next the TIFF Options Dialog pops up, which now gives you a lot more choices than usual. Here you should select 'IBM PC' Byte Order (this does not mean these images can only be read by IBM PC's!), 'None' as the compression scheme and (most importantly to get the alpha right) make sure 'Save Transparency' is checked. |
 |
Bibliography:
| [duff84] | Thomas Porter, Tom Duff - "Compositing Digital Images", Computer Graphics (SIGGRAPH '84 Proceedings), volume 18, pages 253-259, July 1984 It is available online here: keithp.com/~keithp/porterduff. |