Version 1.1

Documentation

last change: 03/24/03


1. LightMan Reference top

This Reference explains the installation and use of the several PlugIn modules LightMan consists of. It's just a plain list of functions and what they do. Often the way a certain option behaves is very dependant on the Renderer you are using or is hard to explain without a deeper knowledge of rendering algorithms. In these cases a reference for further information is given which may be a tutorial, FAQ or an external resource in the Further Reading section.
LightMan 1.1 works best with LightWave 7b, it works fine with 6.5b but not with earlier versions.

1.1. Installation
top

  • For installation you need to have WinZip installed on your Computer. If you don't have WinZip, you can get it from www.winzip.com

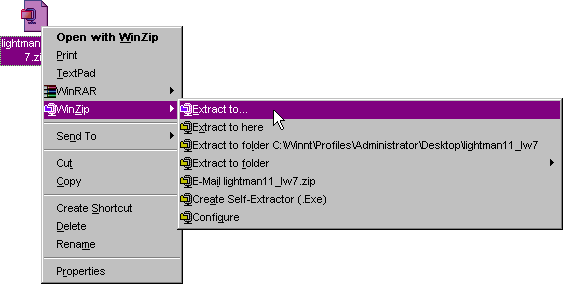
  • Look up the LightMan distribution and right click on it. The Context Menu shows up and there should be a 'WinZip' Menu Entry, which opens another SubMenu. Select 'Extract to...' from that menu (see image below).


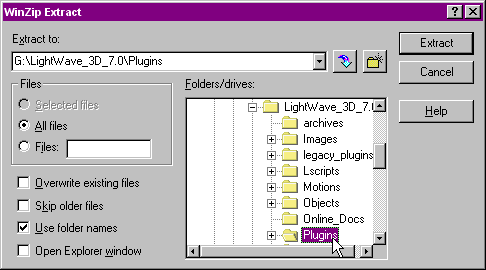
  • WinZip will now prompt you to specify a directory to extract to. Select the LightWave PlugIn directory like in the image below and press 'Extract'.
    It is very important, that LightMan is installed directly into Lightwave's Plugins directory, because otherwise LightMan won't find it's license file and auxiliary files like the standard LightWave LightSource shaders!
  • You have now successfully installed LightMan on your computer, the next step is to register the LightMan PlugIns with LightWave. This process is described here for LightWave [7], it may vary slightly in different versions of LightWave. Consult your LightWave Manual about adding PlugIns when the method described here doesn't work for you.

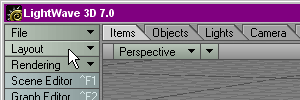
  • Open LightWave and open the 'Layout' Menu in the upper left corner


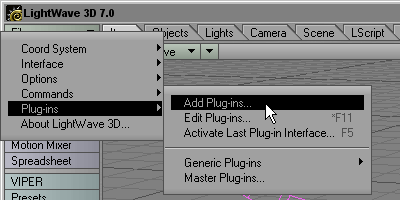
  • Select 'Plug-ins' and then 'Add Plug-ins...' from the menu


  • A file selector dialog appears. Navigate into the LightWave directory which has been created below the PlugIns Directory. Inside that directory you should find a file called lightman.p. Select that file and press OK. LightMan is now registered with LightWave.


  • The PlugIn File contains a bunch of PlugIns for Lightwave. A shader PlugIn (which lets you replace Surfaces by RenderMan Shaders), an Object Replacement PlugIn which enables you to Replace Objects by RIB Archives and Custom RIB Statements and a Generic PlugIn to do the actual RIB Export are visible to the user.

  • You should consider setting the LightWave Alert Level (General Options) to Intermediate or Expert, since LightMan makes use of Info Messages quite a bit.

  • You should load the RenderMan Resource files of the renderer(s) you are going to use into LightMan to add support for that renderer. How to do that is described here.

  • For a first quick tour through LightMan refer to the Getting Started Tutorial.


  • 1.2. LightMan RIB Exporter
    top

    This is the Main PlugIn which does the actual Export. It's a generic PlugIn which can be found under Plug-in Options Menu/Generics in Lightwave Layout.

    1.2.1. Renderer
    top


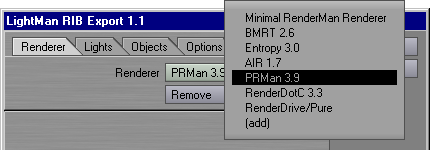
    The picture above shows the Export PlugIn's Renderer Tab. When you first start LightMan you'll only have the Minimal RenderMan Renderer set up. You can customize LightMan to support Renderer Specifics by loading RenderMan Renderer Resource Files. To do that select '(add)' and then choose a .rmr file for a certain Renderer. Some configuration files come with LightMan, the latest configuration files can be downloaded from the LightMan Website.

    Remove removes the currently selected renderer from the list.


    1.2.2. Lights
    top

    The Lights panel let's you set some Light related things that have no LightWave equivalent.
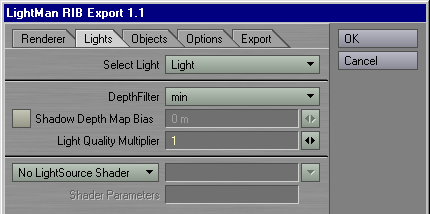


    The DepthFilter determines what depth filter is used for determining what depth value is recorded for a certain pixel in the Shadow Depth Map. The available filters may change dependant on the renderer. Roughly min means the smalles depth found within one pixel will be recorded, max means the maximum depth will be recorded and average will record the average value. The midpoint filter is slightly different but usually works very good when available. It determines visibility by using the middle between the surface nearest to the camera and the surface which is next.

    Shadow maps often suffer from numerical inaccuracy because of their limited spatial resolution. In some cases this will lead to Shadow Maps reporting objects to be in shadow which actually aren't. To avoid this kind of self-shadowing a small fudge-factor is introduced which moves the shadow slightly away from the object. To set this bias on a per LightSource Basis check the Shadow Depth Map Bias checkbox and set the value to a small distance you think is appropriate. Be aware that too high values might detach the shadow from the shadow casting object.

    These two options only apply when depth map shadows are used for this light.

    The Light Quality Multiplier can be used to increase the Light Quality Setting on the Lightwave Light Properties Panel. A value of two means twice the quality set on the LightWave Panel. This only applies to Linear and Area Lights.

    With the options on the bottom of this panel you can replace the current light with a custom RenderMan LightSource Shader.


    1.2.3. Objects
    top

    The Objects panel let's you set some Object related things that have no LightWave equivalent.
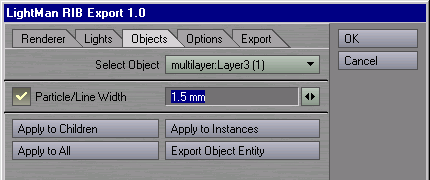


    With the LightWave Renderer you always have to specify the size/thickness of point and line primitives in raster space. LightMan uses these values and tries to do the same, but you might want to override this behaviour by checking the Particle/Line Width checkbox and select an object space thickness. This will let lines and points scale properly when viewed from different distances (raster space points/lines always have a constant width on the screen independent from the distance of the viewer).

    The Apply to Children, Apply to Instances and Apply to All buttons will apply the settings for the current object to its children, all other instances of this object or to all objects respectively.

    The Export Entity function can be used to export individual objects into RIB Archives for later use by LightMan (e.g. through Object Replacement) or from other RenderMan Exporters. The Export Entity Button brings up another Panel which gives you a couple of export options.
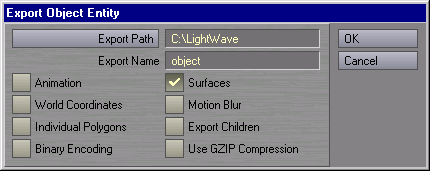


    Export Path and Export Name have the same functionality as the corresponding fields on the Export Tab. The '.rib' extension will be added to the Export Name and in case of Animation Export also a frame number.

    Animation Export means that the whole range of frames from Lightwaves Render Options Panel will be exported, if it isn't checked only the current frame is exported.

    Surfaces will have all surface assignements exported with the object when checked.

    World Coordinates will export all Polygon Vertices in World Coordinates if checked.

    Checking Motion Blur will enable export of Motion Blur information.

    Individual Polygons has the same meaning as the 'Raw Individual Polygons' option from the Export Tab.

    Export Children exports all child objects into the same RIB Archive.

    Binary Encoding and Use GZIP Compression have the same meaning as the corresponding checkboxes on the Export Tab.


    1.2.4. Options
    top

    This panel let's you set up Rendering Options and relates directly to the Options in the RenderMan Interface Specification [ 1 ].


    Pixel Filter is the Sampling Filter used by the Renderer. Which filters you can select here, may depend on the Renderer you are using.
    The Standard Pixel Filters specified by the RenderMan Spec are box, triangle, catmull-rom, gaussian and sinc. Gaussian is basically a slight blur which is usually successfull to a certain degree in hiding sampling artifacts, Catmull-Rom and Sinc usually produce a crisper image. For the description of these filters and nonstandard filters provided by a certain renderer please consult the manual of your particular renderer.

    The Filter Width defines the size or range of influence of the Filter (in pixels). This may have slightly different effects with different filters. In the case of a Gaussian filter a larger value will increase the bluryness.

    Gain and Gamma are the usual Gamma correction controls.

    You may apply one of the standard Imager Shaders as specified in the RenderMan Interface Specification 3.2 or your own shader and it's Imager Shader Parameters.

    Output Type specifies which channels are actually written to the output image file.

    The Shading Rate influences how often per pixel Shading Calculation is done. It basically does the same for Shading, what PixelSamples does for Hidden Surface Eliminination. How this is exactly honored is up to the Renderer and may be very different. REYES Renderers (PRMan, RenderDotC) usually use it to estimate how fine the Objects are being diced into micropolygons and has a great influence on Rendering Time and Quality (you might want to use very high Shading Rates for Previews and lower ones for final Rendering. BMRT uses it to decide whether it will reuse Shading Samples within one Pixel. If Shading Rate is 1.0, BMRT will try to make only one Shading Calculation per Pixel, lower values force BMRT to do more Shading Calculations per Pixel. This can have significant Influence on Rendering Time, but usually less significant than for REYES Renderers.
    Look up your Renderers Documentation on how Shading Rate influences Rendering Quality and Time.

    Shading Interpolation is not always meaningful. In Reyes Renderers it determines, whether the color of a micropolygon is assumed to be the result of the Shading Calculations at one of its Vertices, or whether the Color of all four Corners is interpolated. Usually constant is fine, but it may produce artifacts in some cases, especially when ShadingRate is high.

    Archive, Shader, Texture and Procedural Searchpath are the Searchpath Options passed to the Renderer to let it know, where to look for Shaders, Textures and Archives. You should only edit this, if you use external Shaders, Textures or Archives in your Scene and don't want to copy them to the respective directory LightMan creates. The Syntax is a little bit nonstandard to make sure, that this Options can be used for both, Windows and Unix Systems. The Point tells the Renderer to look into the current directory first, the colons are used for both, seperating entries and for specifying windows drive names. The next standard entry tells the renderer to look in the shaders, textures or archives directory respectively. As an example: If you want to add a directory '../mycustomshaders' to the Shader Searchpath, the line would look like this:
    .:shaders:../mycustomshaders:&
    You should always use forward slashes to seperate directories, if you use backslashes, they must be doubled.

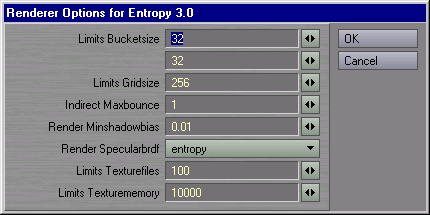
    The RenderMan Interface allows Renderers to have nonstandard Options which are specific to a certain implementation. To access these Options for the currently selected Renderer, use the Renderer Specific Button. It will bring up another window with Options, for the meaning of these refer to the Documentation of your Renderer. The picture below shows an example of the Renderer Specific Options Panel for Exluna's Entropy Renderer.


    1.2.5. Export
    top

    The Export Tab let's you set up the export settings and either export to file for later rendering or render directly with the selected renderer (if it is properly installed on your system).
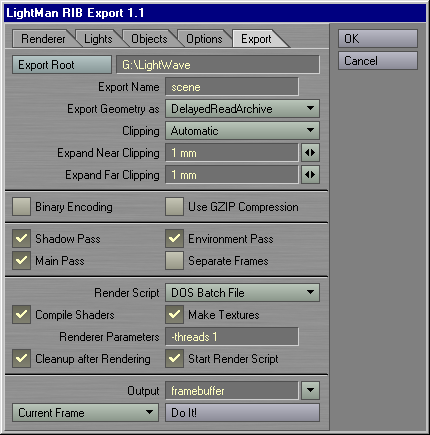


    Export Root is the base directory the all temporary files for Rendering are exported to. If needed also subdirectories are created there which contain RIB Archive Files, Shaders and Textures.

    Export Name is the base name for the main RIB File. This name is also used as base name for the output files, if the output is written to file.

    The Export Geometry as Selector let's you choose how geometric objects are going to be exported.
    • DelayedReadArchive is the Standard Choice and usually the best bet. It means that every object is Exported into an Archive and the main RIB File only contains a reference and Bound Information. The object doesn't use any memory because it only get's loaded when the renderer reaches a screen area which contains the bound and the renderer has to assume that the object is visible. Objects which are found to be offscreen or completely occluded are never loaded and for objects which get loaded loading is deferred.
    • ReadArchive is like DelayedReadArchive but loading of the objects is not deferred.
    • Raw Geometry writes the Objects directly into the RIB Stream and not into external Archives. If objects appear more than once (for example in subsequent frames or in Shadow or Environment Passes) they are completely exported each time which might result in longer export times and a huge RIB file. The upside is, that the whole Scene Geometry is put into one file and not fragmented over a large number of archive files.
    • Raw Individual Polygons is similar to Raw Geometry in so far that it exports geometry only to the main RIB file. With this option Polygon Meshes are always broken up into individual Polygons which will result in even bigger files. Some renderers (like BMRT) sometimes have problems with Polygon Meshes. If you're experiencing strange Polygon shapes missing or degenerate Polygons you might want to try this option. It also lifts the restriction that Polygons have to be planar for four-sided Polygons.
    Clipping will give the renderer some information about in which range of distances from the camera the renderer has to expect geometry. Usually this range is determined automatically by looking on the bounding boxes of all Objects. This may be good for increasing rendering efficiency or numerical accuracy (depending on the renderer). When using the LightMan Object Replacement this might cause objects to dissapear since their bound may be unknown. To cope with that you can expand the clipping range by a certain amount (via Expand Clipping by) or just disable clipping (means: set near and far clipping planes to the minimal/maximal possible value.

    Since ASCII scehen descriptions tend to grow very large you can make your RIB files more compact by using Binary Encoding and GZip Compression. These two options can be used individually or together. These options make hand editing of RIB impractical. Be aware that there might be RenderMan Renderers which won't directly read binary or gzipped RIB or both.

    Shadow Pass, Environment Pass and Main Pass let's you select which passes actually get put out. This may help for preview Rendering, for example if you don't want Shadow Maps or Environment Maps to be rerendered when you just changed a shader. Light Sources will still make use of their Shadow Maps (and the Renderer may complain when they are not there) so this has not the same effect as disabling Shadow Mapped Shadows.

    Separate Frames will write Rendering information for each frame into an individual RIB file instead of one big file.

    The next section is about how Rendering is going to be performed. Since there are in most cases quite a few preparation steps for Rendering (compiling shaders, preparing textures, calling the renderer) those steps are written to a batch file. One can choose not to create this script by selecting '(none)' in the Render Script selector. There may also be support for scriptable render managers in the future.

    Compile Shaders and Make Textures will write the steps necessary to compile shaders and prepare textures into the Script file. This will be ignored if the Renderer doesn't have a shader compiler and/or a texture preparation tool.

    Render Parameters are command line parameters passed to the Renderer. Which command line parameters can be passed to a Renderer is usually described in your Renderers manual, the only Renderer for which this has to be used is RenderDrive/Pure right now, for all other renderers Command line parameters are optional and may be used to control the number of threads of for quickly overriding scene information like output resolution or output filename. For RenderDrive you have to specify the name of the render Host. More information about using this setting with RenderDrive is here.

    Cleanup After Rendering will make sure the Script deletes all temporary files created for Rendering after Rendering.

    Start Render Script let's you decide whether LightMan should start the Render Script right after export. In the case you want to start it on your own: The script is written to a DOS Batch file with the Export Name as its name. In the above example the Render Script would be written to a file scene.bat in the directory G:\LightWave. You can start it by double clicking on it or invoking it from the Command Line.

    Output just let's you specify the display driver the output get's written to. You can either select one of the standard RenderMan display drivers 'file' and 'framebuffer' or type in the name of a custom display driver. Most Renderers come with additional display drivers which let you write the Output to other file types or special devices. Also many Renderers let you write custom display drivers. Consult the manual of your Renderer for more information on that.

    To the left of the Do It! button you can specify whether to Export the current frame only or the whole animation, the button itself starts the output and eventually invokes the Script after that. The Script will be invoked as a separate process, so once LightMan is done with Output and the Render Script is started you can continue working with LightWave or close it to free memory for Rendering.


    1.3. LightMan Surface Shader
    top

    Currently LightMan only exports basic LightWave Surface properties, no textures are exported. For getting textures, you need to write a RenderMan Shader and apply it to a surface using the LightMan Surface Shader as shown below.
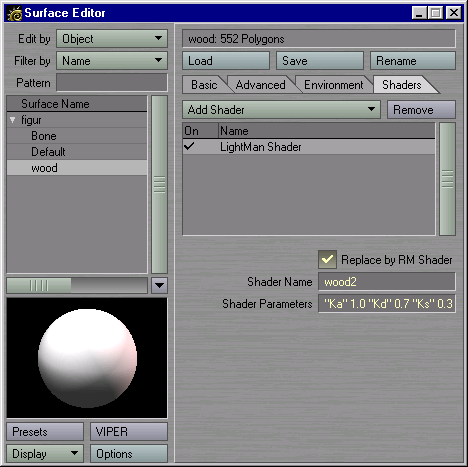


    This example uses the wood2 Shader, which ships with BMRT. You can switch the replacement on and off with the checkbox in the top, the Shader Name is wood2 in this case. The Shader is in the file wood2.sl. Be aware, that a shader name is not neccessarily the name of the file it is in, a file may even contain more than one shader. The Shader Parameters are a token value list which uses the same syntax as used in the .rib File. Nonstandard Tokens need to be inline declared. The whole line in this example is:

    "Ka" 1.0 "Kd" 0.7 "Ks" 0.3 "specularcolor" [1 1 1] "roughness" 0.1 "float txtscale" 8 "color lightwood" [0.75 0.55 0.40] "color darkwood" [0.69 0.44 0.25]

    For an deeper understanding of how this works, I recommend reading the RenderMan 3.2 Spec [ 1 ], especially the paragraph describing the Surface call and Section 3 ('Relationship to the RenderMan Shading Language').
    You'll also have to put this shader somewhere, where your renderer can find it. One way would be copying it to the shaders directory created by LightMan in your export directory, the other way would be adding the directory where it can be found to the Shader Searchpath on the Export Tab in the Export PlugIn. You'll also have to compile this shader by yourself for preview rendering.

    For a good introduction to the concept of Shaders in RenderMan I would recommend the Advanced RenderMan Book [ 3 ] (especially chapter seven) and Steve Mays notes on Shader writing [ 7 ].


    1.4. LightMan Object Replacement
    top

    With the LightMan Object Replacement PlugIn you can easily replace Objects by calls to RIB Archives, RenderMan Procedural objects, calls to implementation specific geometry or abitrary statements which are put directly into the RIB stream.
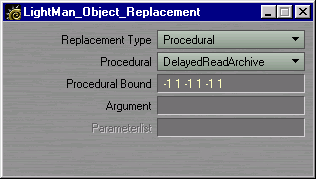


    The Replacement Type lets you select by what kind of RIB Statement this object should be replaced:
    • ReadArchive directly reads a external RIB file as if the commands in the RIB file were at the place of the ReadArchive Statement.
    • Procedural calls one of the Standard RenderMan Procedural Objects. This is a very powerful option, since procedurals are executed when the renderer actually encounters the bound of the procedural while rendering. This means that geometry does not get generated when the bound of the procedural is not seen or completely culled. Exact behaviour depends on the Renderer
    • RIB Statement inserts abitrary text into the RIB Stream. Use this only when you are familiar with RIB.
    • Geometry uses the RenderMan backdoor to add Renderer Specific Geometric primitives. Consult the documentation of your Renderer for details.
    The Procedural lets you select the type of RenderMan Procedural when Replacement Type is set to Procedural:
    • DelayedReadArchive does basically the same as ReadArchive, but the external RIB File only gets loaded when the Procedural is called when the renderer encounters the Bound while rendering.
    • RunProgram calls an external Program which passes geometry to the renderer. The RenderMan Interface Specification 3.2 gives an exact explanation of how to write such programs.
    • DynamicLoad does basically the same as RunProgram but not by calling an external program, but loading a Dynamically Linked Library which creates the geometry.
    Procedural Bound specifies a bound in Object Space. It has to enclose the whole procedurally defined object and is used to determine where the object will appear (or not appear) in the final rendering. The bound is defined by six numbers seperated by spaces in the form: xmin, xmax, ymin, ymax, zmin, zmax.

    The Argument depends on the Replacement and Procedural Type. For ReadArchive it is the name of the RIB File, for Procedurals it's the argument string passed to the procedural (in case of DelayedReadArchive also the name of the RIB File). For the RIB Statement Replacement, Argument is just the string which is directly inserted into the RIB Stream, in case of a geometry replacement it's the name string of the geometric primitive.

    Parameterlist is only used for the Geometry Replacement Type. It's the Parameterlist string passed to the Geometry call (similar to the Shader Parameterlist).

    All these things can be really powerful when used effectively. Chapter 5 in the 'Advanced RenderMan' Book [ 3 ] covers a lot of techniques using Procedural Primitives. Some talks of the Siggraph RenderMan Courses [ 6 ] also give a lot of insight on how to use this effectively. The Basic idea is to use some very simple stand-in geometry for interactive editing in LightWave which can effectively replaced by lots of heavy geometry for final Rendering.
    2. What get's exported (and how) top

    LightMan is designed to use as many settings and Options from within LightWave and directly translate them into the RenderMan format. This Chapter explains which settings are exported, how they get exported, which ones not get exported (and why) and why sometimes settings may produce results that are different from what the LightWave Renderer would produce.


    2.1. Geometry top

    All types of geometry that the LightWave Renderer renders will be exported for Rendering with the RenderMan renderer of your choice. SubPatches and Metaballs will be exported as Polygon Meshes, frozen in Render Resolution.
    Some Renderers might not draw point and line primitives, consult your renderers manual for information on that.
    Have a look at the LightMan Export Options for different ways of Polygon export.


    2.2. Shaders/Surfaces top

    Starting with Release 1.1 of LightMan, LightWave Surface descriptions get converted to RenderMan Shaders. Be aware that the Renderer you use may produce different results than the LightWave Renderer due to internal differences between the renderers or due to the conversion.

    Especially the Procedural Textures do not exactly match the LightWave Procedural Textures, they can only reproduce the same look. Also the multiply blending and divide blending modes don't exactly match the behaviour inside LightWaves.

    Be aware that since the LightWave API doesn't allow LightMan to access all these parameters, many surface parameters are read from the object files directly. This will not succeed, if you changed surface parameters within LightWave but didn't save them to file yet! Always save the Object to disk after you made changes to the surface appearance to make sure LightMan always has access to the latest version of the model!

    This is a list of Surface properties that are converted:


    Basic Surface Properties

    • Color
    • Luminosity
    • Diffuse
    • Specularity
    • Reflection
    • Transparency
    • Refraction Index (no texture)
    • Bump
    • Smoothing/Threshold
    • Double Sided


    Advanced Surface Properties
    • Vertex Color Map
    • Color Highlights
    • Diffuse Sharpness


    Environment Properties

    Refraction Maps are not supported, Environments are partially supported. All Environment Modes except Spherical Map will invoke the raytracing engine (of supported by the renderer). In Spherical Map mode the specified image will be used as reflection map.


    Envelopes

    All supported Parameters can be animated. This animation fully translates to your RenderMan Renderer.


    Texture Maps
    • Layer Type
    • All Blending Modes except Texture Displacement
    • Layer Opacity
    • Invert Layer
    • Image Textures
      • All Projection Types except front projection
      • Wrapping
      • Tiling
      • Pixel Blending
      • Texture Antialiasing
      • Texture Axis
      • Reference Objects
      • World Coordinates
      • Scale
      • Position
      • Rotation

    • Procedural Textures
      • Procedural Types
        • Brick
        • Bump Array
        • Checkerboard
        • Crumple
        • Crust
        • Dots
        • Fractal Noise
        • Grid
        • Honeycomb
        • Ripples
        • Ripples2
        • Turbulence
        • Value
        • Veins
        • Wood
        • FBM

      • Texture Axis
      • Reference Objects
      • World Coordinates
      • Scale
      • Position
      • Rotation

    • Gradient Textures
      • Input Parameters
        • Previous Layer
        • Bump
        • Slope
        • Incidence Angle
        • Light Incidence
        • Distance to Camera
        • Distance to Object
        • X Distance to Object
        • Y Distance to Object
        • Z Distance to Object

      • All Smoothing Types


    You can still produce even more complex surface appearances by writing a RenderMan Shader [ 3 ] and assigning it to a Surface using the LightMan Surface Shader.


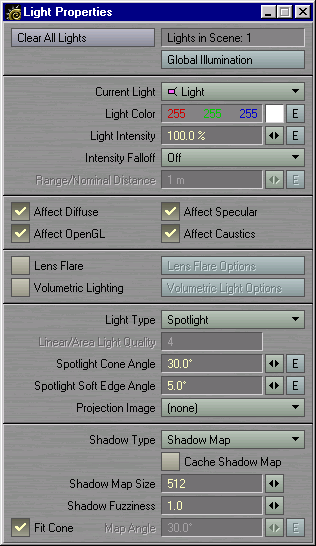
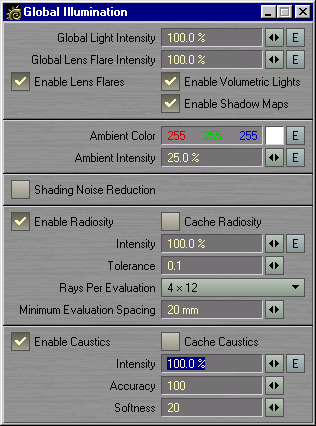
    2.3. Lights and Global Illumination top


    LightMan comes with a set of RenderMan LightSource Shaders which exactly resemble the functionality of all Standard LightWave LightSources. Every Setting here is honored and translated to react in the same way as the LightWave Lightsources except:
    Lens Flare, Volumetric Lighting and the Spotlights Projection Image.

    Some RenderMan renderers may not support Raytraced Shadows, but all of them support Shadow Maps. If a Light is set to use Shadow Mapping, LightWave automatically let's the Renderer create a Shadow Map in a prePass using the Shadow Map Size as Resolution. Some renderers might object when the Size of the Shadow Map is not a power of two, so try to stick with resolutions like 256, 512, 1024, 2048, 4096, etc.

    Cache Shadow Maps will let the renderer use the shadow map created for the first frame of an animation for all subsequent frames. For walthrough animations with not animated objects casting shadows this will greatly save computation time without degrading quality.

    Shadow Fuzziness is honored, but may react very different for different renderers since they all use different methods to filter Shadow Maps.

    If possible try to make the Map Angle as small as possible to increase the quality of the Shadow Map. When only a fraction of the Shadow Map actually contains any objects this is a waste of computation time and memory.


    The Enable Shadow Maps checkbox reacts like you'd expect from the LightWave renderer.

    Ambient Color and Ambient Intensity are exported and react exactly like they do in the LightWave Renderer.

    There is no direct RenderMan equivalent of Shading Noise Reduction, so this setting is ignored.

    Enable Radiosity will tell LightMan to activate Radiosity features as long as the selected Renderer supports Radiosity.

    The Radiosity Intensity is ignored, all other settings work as expected except the Minimum Evaluation Spacing. The value here is interpreted as a maximum pixel distance between Global Illumination Samples where one milimeter is one Pixel. The Tolerance default of 0.0 does not make sense here, you should select values between 0.1 and 0.25 for initial testing and then tweak. The 0.0 Tolerance would force the Renderer to revaluate for every sample which is usually unnecessary and very computationally expensive.

    Cache Radiosity will tell the renderer to save the Global Illumination Samples in a seedfile for potential reuse by subsequent frames.

    Enable Caustics will enable caustic computation, as long as the renderer supports it.

    Cache Caustics and Intensity are ignored.

    Accuracy is used to control the number of Photons traced per Light Source. The number of Photons is Accuracy multiplied by 100.

    Softness is the maximum distance (in Pixels) at which Photons are used to compute Caustics.


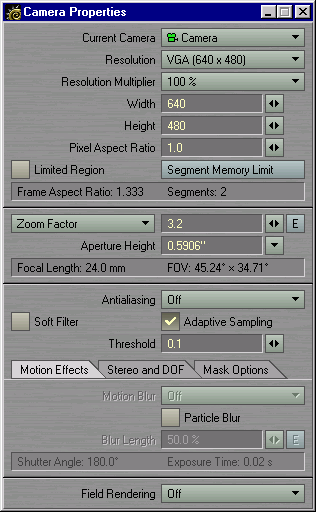
    2.4. Camera and Rendering settings top


    Camera Width and Height values are used directly to determine the Output resolution.

    The Zoom Factor (or Lens Focal Length or Horizontal/Vertical FOV) are directly used to determine the FOV of the Output image.

    Antialiasing Settings are mapped to a number of PixelSamples. The relation between Antialiasing Setting and number of samples is shown in the following table.

    Antialiasing
    PixelSamples
    Off
    1x1
    (Enhanced) Low
    2x2
    (Enhanced) Medium
    3x3
    (Enhanced) High
    4x4
    (Enhanced) Extreme
    5x5

    Adaptive Sampling and the Threshold are ignored.

    Soft Filter is ignored, too, since it has a more flexible equivalent on the LightMan RIB Exporters Options Tab. To create a Soft Filter Effect, choose the gaussian filter and enlarge the Filter width.

    The Motion Blur checkox is used to activate export of Motion Blur information. Even though the Lightwave renderer does not support Motion Blur when Antialiasing is Off, LightMan does. So if you want to quickly test Motion Blur set Antialising to a higher setting, switch on Motion Blur and then set Antialiasing back to 'Off'. When Dithered Motion Blur is selected the number of Pixel Samples in x and y direction is multiplied by 2. The Blur Length value is honored.

    Field Rendering is ignored.

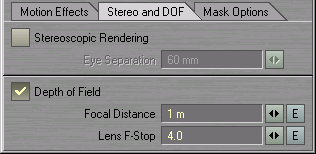
    Stereoscopic Rendering is ignored.

    Depth Of Field is exported (independent from the AntiAliasing setting like Motion Blur).


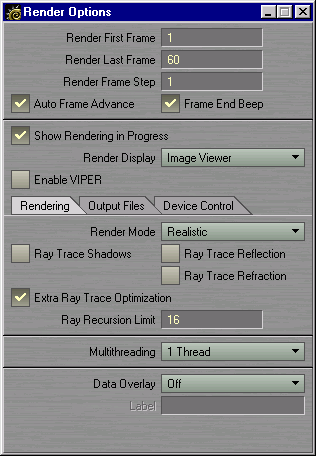
    Render First Frame, Render Last Frame and Render Frame Step are honored and work like expected when Exporting to File (Render Preview always renders the current frame).

    Render Mode is used to switch between different rendering modes. For QuickShade and Wireframe Mode a simpler description is created and the Preview Renderer (if there is one) is invoked instead of the main rendering application.

    Ray Trace Shadows, Ray Trace Reflection and Ray Trace Refraction are honored and used to switch on Ray Tracing features in the particular Renderer. Either one of 'Ray Trace Reflection' or 'Ray Trace Refraction' checked will activate both features, because this difference is usually not made in RenderMan renderers. Be aware that activating Ray Tracing might change the memory use of a certain renderer tremendously. On the other hand if you don't use Raytracing features in your scene at all, explicitly switching raytracing off here can reduce memory overhead and speed up rendering.

    The Ray Recursion Limit is passed to all renderers that support Raytracing. The LightWave default of 16 is usually too high. A value of 4 will do the job in most cases and save you a lot of computation time.

    All other options on this panel are ignored.


    2.5. Fog and Volumetrics top

    Fog does get exported, all Fog Types are supported, but the 'Use Background Color' Option does not work.

    Volumetrics and Volumetric Lights are irgnored in this version of LightMan.


    2.6. Limitations top

    There are a few things LightMan just can't export. These things include:
    • Hypervoxels
    • Output of Object Replacement PlugIns
    • Surface Shading PlugIns


    3. Tutorials top

    This section is supposed to contain simple step by step instructions to provide solutions to common complicated situations. If you feel that something is missing here, send your tutorial suggestions to td@td-grafik.de.


    3.1. Getting started top

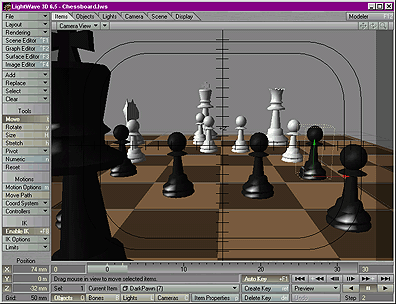
    At first load the 'Chessboard.lws' scene that comes with Lightwave. Loaded in Lightwave the scene should look like below.


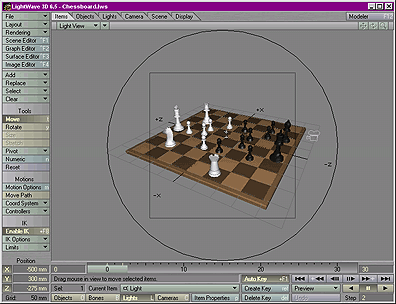
    Lets first do some changes to the Lighting. Change the Light position to X: -500, Y: 300, Z: -275 and bring up the Light Properties panel. Change the Light Type to Spotlight, the Shadow Type to Shadow Map, uncheck Fit Cone and set the Map Angle to 20.0°. If you change the Viewport Type to Light View it should look like the screenshot below.


    You'll notice that the Shadow Map with that angle covers a smaller area than the chessboard, but that's perfectly ok, because nothing outside the Shadow Map will actually cast any shadows (there's nothing for the chessboard to cast shadows on). This is a good way to increase rendering efficiency. You could even completely disable shadow casting for the Chessboard object to completely remove it from the Shadow Map generation pass.

    You might also want to increase the AntiAliasing setting a little (Lightwaves Camera Properties).

    Now let's start with the export preparations. Bring up the PlugIn Options panel and select the LightMan_RIB_Export Generic PlugIn. On the LightMan Panel select the Renderer you want to use. Refer to the Reference of the Renderer Tab to learn more about this step.


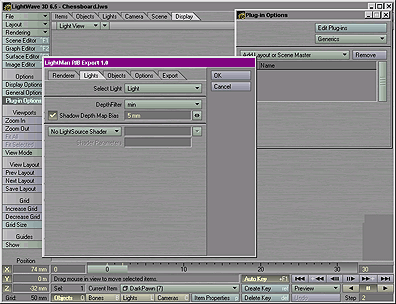
    Next bring up the Lights Tab, make sure the depthfilter is set to 'min' (or 'none' if different depth filters are not supported by the renderer), check the 'Shadow Depth Map Bias' checkbox and set the bias to 0.005 like on the screenshot above.

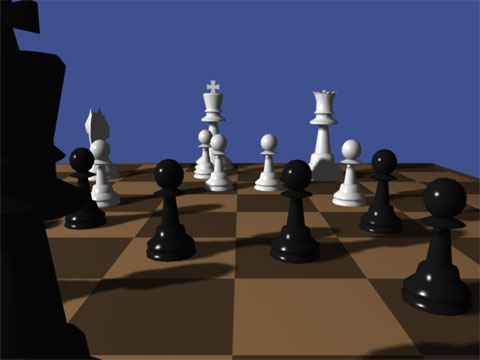
    Now we are prepared to select the Export Tab, make sure the Export Type (bottom left) is set to 'Render Preview' and hit the 'Do It!' button. The picture below has been rendered with Entropy.


    3.2. Using a RenderMan Shader for Texture Mapping top

    In Version 1.0 of LightMan only basic Surface properties got exported, but were still able to use a broad range of Surface appearances. This is not an issue any more since version 1.1, but you might still want to alter the surface appearance beyond what is possible with LightWave's Shading paradigm. RenderMan Renderers always accept Surface Descriptions as a small program in the RenderMan Shading Language. This allows you to change every aspect of a surface appearance just by using a custom shader. This short tutorial should get you started on how to apply custom RenderMan Shaders to surfaces using LightMan. It is shown how to use one of the standard surfaces coming with every RenderMan renderer can be used to apply a color textures.


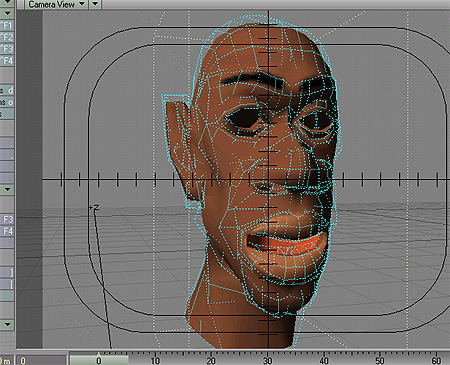
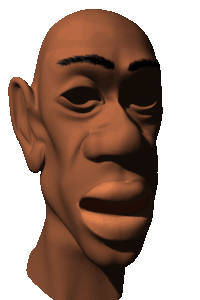
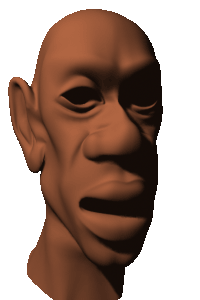
    The screenshot above shows a head model with a color texture applied to add the eyebrows and add some detail to the mouth. If we hit F9 in Lightwave, we get the left of the pictures below, just hitting 'Render Preview' within LightMan will yield the result on the right (rendered with Entropy in this case).


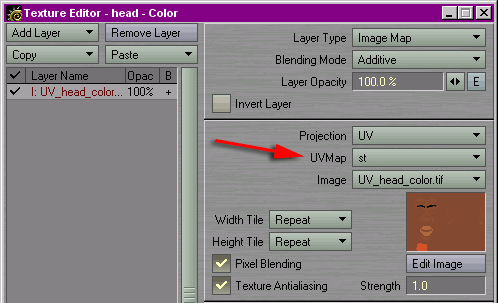
    As you can see the model and texture are fine, but the texture is missing. As a preparation step we should make sure, that the name of the UV Texture Channel we use for projection of the texture map is 'st'. As in Lightwave the Names of texture channels in RenderMan are abitrary, but we should stay out of the way of reserved names ('uv' for example is reserved for something else), they shouldn't contain spaces and 'st' is the standard name for texture coordinates in RenderMan, so all the default or example shaders will look for texture coordinates there.


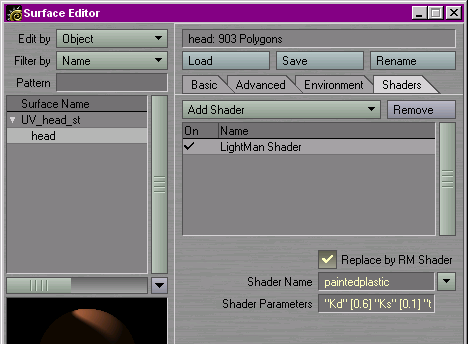
    Next we have to change the surface Shader of the exported object. To do that, we apply the 'LightMan Surface Shader' to the Surface of our Head. This will replace the standard RenderMan Shader LightMan uses to approximate the Lightwave Surface by a different shader of your choice.
    Here our choice is one of the Standard RenderMan Shaders: 'paintedplastic'. The standard RenderMan Shaders are available through the dropdown box next to the 'Shader Name' field (don't forget to switch on replacement first).
    The Shader Parameters are passed to the Shader, which parameters are available depends solely on the Shader. This Shader Parameter string consists of Token Value Pairs, which means the first string is the name of a parameter, the next thing (usually in brackets) is the value, next comes a parameter name again and so on. The Parameter Line we want to use here is:

    "Kd" [0.6] "Ks" [0.1] "texturename" ["head_hcol.tex"]


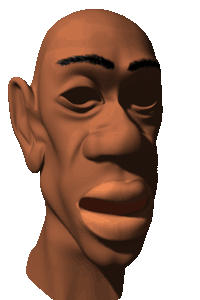
    Hitting the 'Render Preview' Button now produces the picture below.

    That looks better, doesn't it? But what did we actually do?

    Let's examine the Shader Parameter line:
    Kd is the standard RenderMan name for the diffuse coefficient of the Surface, Ks stands for the specular component. Texturename is self explanatory, but you have to be careful with the name of the texture file itself. The original texture file used within LightWave was called 'hcol.jpg'. LightMan has to do some preprocessing with the texture which is expected by the RenderMan renderer. First it evaluates all image filters you may have applied and saves the texture as a tiff file with the name of a scene (and an underscore) as prefix, so 'hcol.jpg' is saved to 'head_hcol.tif' if the name of our scene is 'head'. Then LightWave invokes the preprocessor of your Renderer which saves the texture to another file with the same name but the extension '.tex'. This is a little complicated but makes sense. The first step makes sure that image filters are applied to the texture and that it is in a format every RenderMan Renderer can read (tiff is supported by all RendeMan renderers). What the second step does depends on the Renderer, but it usually optimizes the texture for filtering, fast access and memory efficiency. LightMan does this processing automatically for all image files used in the scene, so if you want to use an image file in a RenderMan shader it makes sense to somehow use it in the LightWave Scene so it gets exported properly. You can also do this conversion by hand, how this can be accomplished will be mentioned in the manual of your Renderer. You can find the image files inside the 'textures' directory below the export root if you are not sure about the filename of a certain texture.

    The same also applies to Shaders. If you use shaders different from the standard RenderMan Shaders you'll have to compile them with your Renderers Shader compiler and make sure the Renderer can find them (either by copying them to the export root or pointing the 'Shader Path' on the Options Panel to the directory the shader is in.

    The head model used in the tutorial above is courtesy of Ikemefuna Okafor (ikem@mb.rosenet.ne.jp)


    4. Renderer Specific top

    This Chapter contains Information important about using LightMan with certain Renderers.


    4.1 Using LightMan with ART's RenderDrive/PURE
    top

    Installation

    LightMan uses the RenderPipe RIB program to interface with RenderDrive/Pure, so you have to make sure RenderPipe RIB is installed properly on your system and is added to the path. How to do this is described in the RenderDrive/Pure Documentation in the 'RenderPipe RIB' section.


    Things you should keep in mind:

    Don't forget to set the 'Render Parameters' field on the Export Tab to the name or IP adress of your render host(s) when rendering with RenderDrive. For PURE, the default 'localhost' is fine as well as 'PURE'.

    RenderPipe does not support the framebuffer Display Driver, so images get always written to disk.

    Since RenderDrive is so fast on Raytracing it doesn't support Shadow Mapping to generate Shadows. Make sure no Light in your Scene uses Shadow Maps for Shadow Generation because these Shadows won't show up when Rendering with RenderDrive/Pure.

    LightWave let's you choose certain Objects to be invisible for the Camera, and in Reflections. These settings will be ignored and every Object will always be visible.


    5. Troubleshooting top


    Objects crossing the eye-plane seem to dissapear or the renderer issues an error message related to 'splitting' when using PRMan or RenderDotC

    Users of traditional REYES Renderers might run into a problem with Eyesplits. Usually the Renderer issues a warning about a certain primitive not splitting at the eye plane.
    REYES renderers split primitives into smaller pieces until they not longer exceed certain criterions (like the number of micropolygons the grid will be diced into, screen space size, maximum number of splits, etc.). If the a grid is created, cannot be culled because it's offscreen but passes through both, the near clipping plane and the plane parallel to the near clipping plane passing through the point of view (the eye plane) the renderer cannot project the primitive to raster space since the math to do this only works for points in front of the camera.
    Prone to this kind of error are big ground planes and objects moving fast towards or away from the camera (with motion blur enabled). Objects with large Motion Blur or especially near to the camera will increase this problem. Splitting for Primitves whose motion path actually goes through the camera splitting can never succeed.
    Solutions can be to increase the maximum number of possible splits (you may find an 'eyesplits' Option on the Renderer Specific Options Panel) which is exactly the maximum number of eyesplits. Be careful with increasing this number because it may greatly increase rendering time and memory consumption.
    For ground planes it is worth to try increasing the geometric detail (e.g. use several smaller Polygons for things like ground planes) especially in regions near the camera.
    Also the near clipping plane should be as far away from the camera as possible, if you are using no clipping, switch to automatic clipping and eventually try to set 'Expand Clipping By' to zero or even a small negative value.
    For a more in-depth coverage of this topic please refer to [ 3 ].


    My Objects look too dark/dirty or the Shadows appear detached from the Objects casting them when using Shadow Maps

    The Lightwave Renderer never let's you set the Shadow Bias. In general the automatic Shadow Biasing Lightwave uses works good, but in some situations you can still get self-shadowing artifacts. Most RenderMan renderers let you set the Shadow Bias explicitly. Usually there is one per light and a global bias value (often called 'minshadowbias') whose interrelation might be different for different renderers. More details are given in the Lights Panel section and in the manual of your Renderer.


    Polygons get all screwed up when rendering with BMRT

    BMRT takes the planarity criterion for Polygons (all vertices of a Polygon have to lie on the same plane in space) much more seriously than the LightWave renderer to speed up rendering. Sometimes you might run into problems with nonplanar Polygons which didn't show up with the Lightwave Renderer. Try to keep all Polygons planar or just dice them into triangles (which are by definition always planar).
    There are also cases in which BMRT draws Polygons wrong or not at all. This only occurs with Polygon Meshes so LightMan has a setting which puts out Polygon Meshes as individual Polygons (see the 'Raw Individual Polygons' setting of the 'Export Geometry as' button on the Export Tab). This also lifts the planarity restriction for four sided Polygons although at the cost of longer export times and larger .rib Files.


    PRMan renders very slow and/or produces artifacts at concave Polygons

    Triangles are known to be especially slow with PRMan (that's actually mentioned in one of Pixars application notes) and PRMan (v3.9x) also seems to have Problems with concave Polygons. If you are using PRMan, try to only use convex (and if possible four-sided) Polygons to avoid tesselation errors.


    BMRT just renders black

    It appears that BMRT in most cases just renders a black image when 'DelayedReadArchive' is selected as the Geometry Export Type. Selecting one of the other possible types on the Export Tab fixes this.


    BMRT renders Objects in strange Positions/Objects dissapear

    There is a bug in BMRT that sometimes causes Objects to be rendered with a wrong transformation and thus showing up at unexpected positions or out of the field of view when 'ReadArchive' is selected as Geometry Export Type. Choosing a different Geometry Export Type like 'Raw Geometry' or 'Raw Individual Polygons' on the Export Tab fixes this.


    Some automatically generated Shaders don't compile with RenderDotC 3.3 or lower

    LightMan uses a few Shading Language features (e.g. the matrix data type) which were not available in Versions of RenderDotC prior to 3.3.1. It is therefore not recommended to use a version of RenderDotC which is older than 3.3.1.


    LightMan seems not to Export certain Objects in Animations or when Render and Display Dicing Rate for Subdivision Meshes or Metaballs are different (LightWave 6.5b only)

    This is a known Problem and there is no clean automatic solution in LightWave 6.5b. The Problem appears when LightWave has to reevaluate Objects before they get exported by LightMan. This happens when Objects change from frame to frame (deformation, motion, etc.) or when SubPatches or Metaballs have to be diced in a different resolution than for display. LightWave only does this evaluation when the Polygon count of the object is below the 'Bounding Box Threshold' and 'Dynamic Update' is set to 'Interactive' (Display Options Panel).
    A solution is to manually set the Bounding Box Threshold to a very high value (such as 1000000000) and Dynamic Update to 'Interactive' before exporting.


    The images appear too bright when rendered to the Framebuffer

    Many Renderers Framebuffers automatically adjust for a monitor gamma of 2.2, which may let your images appear too bright. To override this, you can usually set an environment variable. For Entropy create a GAMMA environment variable and set it to 1.0. For RenderDotC this variable is called DSPYGAMMA. For other Renderers consult their manual to find out how to change the framebuffers gamma setting.


    I get a 'Parameter out of Bounds' error message when rendering with AIR

    This can have lots of reasons but one common case is that AIR seems to have a pretty tight upper limit for the maximum number of ray bounces which is below the default LightWave setting of 16. This message doesn't hurt, but if you want to get rid of the warning message you should set the 'Ray Recursion Limit' on LightWave's Render Options Panel to a lower number. This is probably a good idea anyway, since this limit is way too high for the general case and can significantly influence render times. Usually for scenes that use Ray Tracing only for Shadows 1 is fine, with reflections 4 will be appropriate and for some scenes with refraction you may need to increase the value to 8. Higher values will almost never have any visible result.


    The render doesn't seem to start properly when using an UNC path as Export Root

    There are problems when using UNC path's in DOS Batch Files. It still works when you disable the 'Start Render Script' Checkbox on the Export Tab and locate a Batch File (extension .bat) with the Name you specified as Export Name with the Windows Explorer. Double-Clicking on that file will start the rendering process.


    The image I get when rendering with LightMan doesn't reflect all the changes I recently made to my Surfaces

    Many Surface Parameters cannot be accessed through LightWave's programming interface so LightMan has to read them directly from the Object file. This has the drawback that LightMan doesn't know about all recent changes to Surface appearances when you didn't save the changed Objects. Saving all Objects should solve this problem.


    When rendering with RenderDrive/PURE objects which are partially transparent still cast shadows as if they were opaque

    To speed up rendering all objects are considered opaque in shadows by default. To change this bring up the 'Renderer Specific' Panel from the 'Options' Tab and change 'Render Casts_shadows' from 'opaque' to 'shade'.


    RenderDrive/PURE issue an error about not being able to find certain texture files

    There is a limit on Texture name length in RenderDrive. Texture names being longer than 31 characters (including extension but not including the path) will get truncated and thus produce errors when RenderDrive tries to look them up.


    6. Advanced Topics top

    This chapter deals with more advanced topics related to RenderMan and LightMan. A good knowledge of RenderMan and Graphics/Rendering Algorithms is required.


    6.1 Adding support for a new Renderer
    top

    The support for a certain Renderer is added through a .rmr file. A few rmr files come with the distribution and are located in the LightMan folder. You can always download the latest rmr files from the LightMan website.
    This chapter deals with the structure of this file and enables you to add support for new Renderer or tweak settings for one of the standard renderers. The file to describe specific Renderers has been derived from the RenderMan Interface Specification 3.2, but these two are not interchangable!

    The following table describes all the Statements in a rmr file which are interpreted by LightMan, all parts of the statements printed in italics are what the user can edit. Not all Statements are required. There are two types of Statements, one which has an argument and another one that just marks the beginning of an information block. Statements with arguments have to be in one line with their arguments (even if they are formatted into several lines in the documentation below), block statements are followed by multiple lines of information which can have different formats. All statements begin with '##'.

    Header
    ##RenderMan Resource-1.0
    A file has to begin with this Statement to be recognized as a RenderMan Resource File
    [required]
    ##Renderer My Renderer 1.0
    This is the name of the Renderers as it appears in the user interface
    [required]
    ##RendererShortName myrenderer
    This is a short version of the renderer Name. It shouldn't contain spaces and Version numbers
    [required]
    ##RendererCommand render
    This is the command to launch the renderer
    [required]
    ##RendererCmdParams parameterlist
    Here you can specify standard command line parameters for this renderer. This is especially useful if the renderer cannot be started without additional command line parameters, but you still want the user to be able to edit these.
    [optional]
    ##PreviewerCommand preview
    This is the command to launch a preview renderer, if there is such a thing
    [optional]
    ##WirePreviewerCommand preview -wire
    This is the command to launch a wire preview renderer, if there is such a thing
    [optional]
    ##ShaderCompilerCommand shader
    This is the command to launch the shader compiler, if there is such a thing. If no Shader Compiler is specified, the Shaders are not getting compiled. Only leave this out if the Renderer can take uncompiled shaders.
    [optional]
    ##MakeTextureCommand mktex
    This is the command to launch the texture preprocessor, if there is such a thing. If no MakeTextureCommand is specified, a corresponding MakeTexture is written into the RIB File instead.
    [optional]
    ##MakeLatLongEnvironmentCommand mktex -l
    This is the command to launch the preprocessor for Spherical Environment Maps, if there is such a thing. If no MakeLatLongEnvironmentCommand is specified, a corresponding MakeLatLongEnvironment is written into the RIB File instead.
    [optional]
    ##MakeCubicEnvironmentCommand mktex -c
    This is the command to launch the preprocessor for Cubic Environment Maps, if there is such a thing. If no MakeCubicEnvironmentCommand is specified, a corresponding MakeCubicEnvironment is written into the RIB File instead.
    [optional]
    Hints Block
    ##Hints
    This block contains hints about certain details of the renderer, the following is a list of the hints interpreted by LightMan
    [optional]
    ZDD_ZFILE
    ZDD_FILE
    ZDD_SHADOW

    Only one of these hints is valid in the hint block. It tells LightMan to what file type Shadow Depth Files are written. PRMan, BMRT and Entropy use an optional 'zfile' as display driver for writing shadow maps, some renderers directly write to a 'file', some renderers may be able to directly write a shadow map file, which doesn't need any further preprocessing. The default is ZDD_FILE.
    VISIBILITY_IGNORE
    VISIBILITY_ENTROPYSTYLE
    VISIBILITY_BMRTSTYLE

    BMRT introduced a certain Attribute to make primitives visible/invisible for camera, shadow and reflection rays. If VISIBILITY_BMRTSTYLE is set, this attribute is used. Entropy introduced a different way of specifying visibility, which is used when VISIBILITY_ENTROPYSTYLE is specified. There are other renderers using these attributes, the name is based on the renderer which first introduced these attributes. If VISIBILITY_IGNORE is set, no visibility is specified for each primitive (this is the default).
    NO_INLINE_DECLARATIONS
    This flag can be specified when the Renderer doesn't accept inline declarations. All inline declarations get replaced by explicit calls to 'RiDeclare'
    AIR
    BMRT
    ENTROPY
    PRMAN
    RENDERDRIVE

    These hints are reserved for internal use to adjust for certain renderers - currently only used to switch Raytracing on/off for AIR
    SHADINGRATE_IS_OPTION
    In the original RenderMan Specification ShadingRate was an Option. In newer versions of PRMan and the Specification 3.2 is was made an Attribute which can be applied on a per Object basis. LightMan makes use of this to optimize Shadow Map generation but some Renderes might still only accept ShadingRate as an Option. If this hint is set, ShadingRate is only set globally.
    RenderMan Capabilities Block
    ##RenderManCapabilitiesAvailable
    This block contains informations about the available RenderMan capabilities. These are basically the capability names from the RiSpec 3.2, but there are a few additional ones
    [required]
    Area Light Sources
    Bump Mapping
    Deformations
    Displacements
    Environment Mapping
    Level Of Detail
    Motion Blur
    Programmable Shading
    Radiosity
    Ray Tracing
    Shadow Depth Mapping
    Solid Modeling
    Special Camera Projections
    Spectral Colors
    Texture Mapping
    Trim Curves
    Volume Shading

    Procedural Geometry
    Indirect Illumination
    ##IndirectLight indirect
    The name of a built in LightSource which handles indirect Illumination Effects, often called 'ndirect'
    [optional]
    ##CausticLight caustic
    The name of a built in LightSource which handles Caustic Effects, often called 'caustic'
    [optional]
    Renderer Specific Options/Attributes Block
    ##RendererSpecific
    This block contains information about the Options and Attributes a particluar renderer implements and how to use them. For each Option/Attribute there is a line, consisting of:
    • The keyword Option or Attribute
    • Attribute Name
    • Attribute Token
    • Attribute Datatype
    • The default value(s)
    • The valid range for the value(s)
    • A string defining what to do with the Option
    [optional]

    Attribute Name, Token and type is what the documentation of your Renderer will tell you. Use the Renderers default value, since the default is used to initialize the value and when the value set by the user is the same as the default, the Option is not written to the RIB File. A range does not have to be given, for numerical values it's a min max pair, for strings it can be an unlimited number of fixed string values.
    The last string tells LightMan what to do with this Attribute/Option. Possible Values are:
    "shown"
    This means the Option will show up in the 'Renderer Specific' Dialog for the user to choose a value.
    "hidden"
    Reserved for future use. Right now everything flagged to be hidden will be ignored.
    "antialiasing" (Option only)
    This Option will be used to control Antialiasing Quality. A few renderers provide alternative Antialiasing controls instead of PixelSamples, if provided one or more Antialiasing Option can be used instead of PixelSamples. The Antialiasing quality setting in LightWave is used to get a proper value, the actual value is determined by linear interpolation between the minumum value given for Antialiasing Off to the Maximum value given for Antialiasing (Enhanced) Extreme. Be aware that higher values than the maximum may be produced when Dithered Motion blur is enabled. This Option can only be of type 'float' or 'integer', if no Option flagged as Antialiasing is provided, PixelSamples is used.
    "searchpath" (Option only)
    The Searchpath Options.
    "raydepth" (Option only)
    This is the where the maximum Ray Depth specified in LightWave goes if an Option with this Flag is provided. The type may only be 'integer'.

    A few Examples:

    Option "searchpath" "archive" "string" [""] [] "searchpath"

    This is a pretty straightforward example of a searchpath Option. No default and no range is given, since it's a plain string parameter.

    Option "render" "specularbrdf" "string" ["rdcclassic"] ["standard" "bmrt" "prman" "rdcclassic" "torrance"] "shown"

    This is a string Option slightly different from the above example. It can not contain any string, but only the strings predefined in the range bracket. In the case of a string the range can hold more than two values, which will then show up in a pulldown menu. The default has to be a value from that list. This only makes sense for Options/Attributes that are flagged as 'shown' and thus show up in the User Interface.

    Option "limits" "spatialquality" "integer[2]" [1 1] [1 5] "antialiasing"

    This is one of Entropy's Renderin Quality Settings. This also demonstrates the use of arrays. For an array you need to specify a default for every array element, the range is only specified once and assumed to ve valid for every array element.
    It's probably a good idea to look at a few of the .rmr Files coming with LightMan to see how things work.


    7. Further Reading top

    [ 1 ]
    RenderMan Interface Specification 3.2
    Pixar, July 2000
    www.pixar.com/products/rendermandocs/toolkit/Toolkit/index.html
    [ 2 ]
    The RenderMan Companion - A Programmer's Guide to Realistic Computer Graphics
    Steve Upstill
    Addison Wesley, 1990
    [ 3 ]
    Advanced RenderMan - Creating CGI for Motion Pictures
    Anthony A. Apodaca, Larry Gritz
    Morgan Kaufmann, 2000
    www.mkp.com/renderman
    [ 4 ]
    LightWave Manual
    [ 5 ]
    The REYES image rendering architecture
    Robert L. Cook, Loren Carpenter and Edwin Catmull
    Computer Graphics (SIGGRAPH '87 Proceedings), pages 95-102, July 1987
    [ 6 ]
    Miscellaneous Sippraph RenderMan Course Notes
    www.renderman.org/RMR/Books/index.html#Sig
    [ 7 ]
    RManNotes
    Steve May
    www.cgrg.ohio-state.edu/~smay/RManNotes
    [ 8 ]
    Texturing & Modeling - A Procedural Approach (second edition)
    David S. Ebert et al.
    Academic Press, 1998
    www.cs.umbc.edu/~ebert/book/book.html


    8. License/Disclaimer top

    Copyright © 2001 Timm Dapper. All rights reserved.
    LightMan is a trademark of Timm Dapper

    THIS SOFTWARE IS DISTRIBUTED "AS-IS" WITHOUT WARRANTY OF ANY KIND
    AND WITHOUT ANY GUARANTEE OF MERCHANTABILITY OR FITNESS FOR A
    PARTICULAR PURPOSE.
    In no event shall Timm Dapper be liable for any indirect or
    consequential damages or loss of data resulting from use or performance
    of this software.
    NO ONE MAY REDISTRIBUTE LightMan or any parts of it.

    Every licensee of LightMan may freely use and/or alter the Shader Source
    and Headers coming with the distribution or created on the fly by LightMan
    under the condition that enhancements/changes to any of the files
    are contributed back to td@td-grafik.de.

    RenderDrive and PURE are trademarks of Advanced Rendering Technologies

    The RenderMan ® Interface Procedures and Protocol are:
    Copyright 1988, 1989, Pixar
    All Rights Reserved
    RenderMan ® is a registered trademark of Pixar