This Reference explains the installation and use of the several PlugIn modules LightMan consists of. It's just a plain list of functions and what they do. Often the way a certain option behaves is very dependant on the Renderer you are using or is hard to explain without a deeper knowledge of rendering algorithms. In these cases a reference for further information is given which may be a tutorial, FAQ or an external resource in the Further Reading section.
LightMan 1.0 works best with LightWave 6.5b, lower Versions of LightWave are not supported, version 7 works fine.
Extract the .zip file into your PlugIns directory, which should then create a new LightMan Directory below in the PlugIns Directory.
It is very important, that the LightMan directory is put below Lightwave's Plugins directory, because otherwise LightMan won't find it's license file and the shaders!
Next register the
lightman.p PlugIn from within Lightwave (more information on
how to load PlugIns into Lightwave can be found in the Lightwave Manual).This should add a bunch of PlugIns to Lightwave, a shader PlugIn (which lets you replace Surfaces by RenderMan Shaders), an Object Replacement PlugIn which enables you to Replace Objects by RIB Archives and Custom RIB Statements and a Generic PlugIn to do the actual RIB Export are visible to the user.
For a first quick tour through LightMan refer to the Getting Started Tutorial.
You should consider setting the LightWave Alert Level (General Options) to Intermediate or Expert, since LightMan makes use of Info Messages quite a bit.
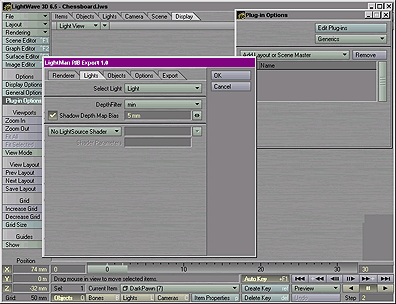
This is the Main PlugIn which does the actual Export. It's a generic PlugIn which can be found under
Plug-in Options Menu/Generics in Lightwave Layout.
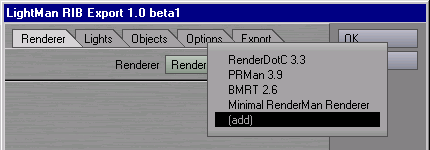
The picture above shows the Export PlugIn's Renderer Tab. When you first start LightMan you'll only have the Minimal RenderMan Renderer set up. You can customize LightMan to support Renderer Specifics by loading RenderMan Renderer Resource Files. To do that select '(add)' and then choose a .rmr file for a certain Renderer. Some configuration files come with LightMan, the latest configuration files can be downloaded from the LightMan Website.
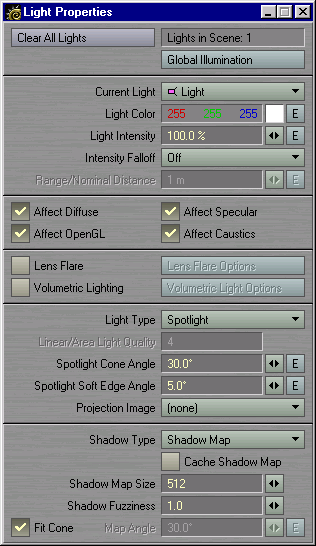
The Lights panel let's you set some Light related things that have no LightWave equivalent.
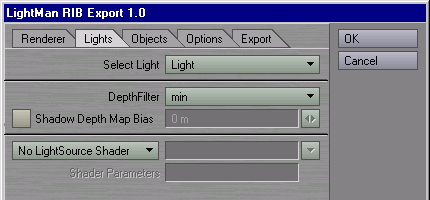
The DepthFilter determines what depth filter is used for determining what depth value is recorded for a certain pixel in the Shadow Depth Map. The available filters may change dependant on the renderer. Roughly min means the smalles depth found within one pixel will be recorded, max means the maximum depth will be recorded and average will record the average value. The midpoint filter is slightly different but usually works very good when available. It determines visibility by using the middle between the surface nearest to the camera and the surface which is next.
Shadow maps often suffer from numerical inaccuracy because of their limited spatial resolution. In some cases this will lead to Shadow Maps reporting objects to be in shadow which actually aren't. To avoid this kind of self-shadowing a small fudge-factor is introduced which moves the shadow slightly away from the object. To set this bias on a per LightSource Basis check the Shadow Depth Map Bias checkbox and set the value to a small distance you think is appropriate. Be aware that too high values might detach the shadow from the shadow casting object.
These two options only apply when depth map shadows are used for this light.
With the options on the bottom of this panel you can replace the current light with a custom RenderMan LightSource Shader.
The Objects panel let's you set some Object related things that have no LightWave equivalent.
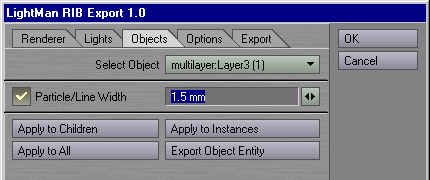
With the LightWave Renderer you always have to specify the size/thickness of point and line primitives in raster space. LightMan uses these values and tries to do the same, but you might want to override this behaviour by checking the Particle/Line Width checkbox and select an object space thickness. This will let lines and points scale properly when viewed from different distances (raster space points/lines always have a constant width on the screen independent from the distance of the viewer).
The Apply to Children, Apply to Instances and Apply to All buttons will apply the settings for the current object to its children, all other instances of this object or to all objects respectively.
The Export Entity function can be used to export individual objects into RIB Archives for later use by LightMan (e.g. through Object Replacement) or from other RenderMan Exporters. The Export Entity Button brings up another Panel which gives you a couple of export options.
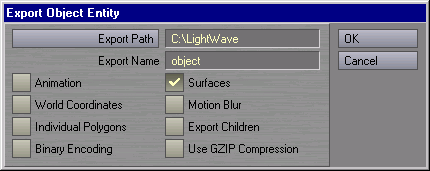
Export Path and Export Name have the same functionality as the corresponding fields on the Export Tab. The '.rib' extension will be added to the Export Name and in case of Animation Export also a frame number.
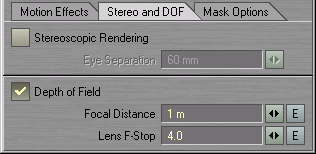
Animation Export means that the whole range of frames from Lightwaves Render Options Panel will be exported, if it isn't checked only the current frame is exported.
Surfaces will have all surface assignements exported with the object when checked.
World Coordinates will export all Polygon Vertices in World Coordinates if checked.
Checking Motion Blur will enable export of Motion Blur information.
Individual Polygons has the same meaning as the 'Raw Individual Polygons' option from the Export Tab.
Export Children exports all child objects into the same RIB Archive.
Binary Encoding and Use GZIP Compression have the same meaning as the corresponding checkboxes on the Export Tab.
This panel let's you set up Rendering Options and relates directly to the Options in the RenderMan Interface Specification [ 1 ].
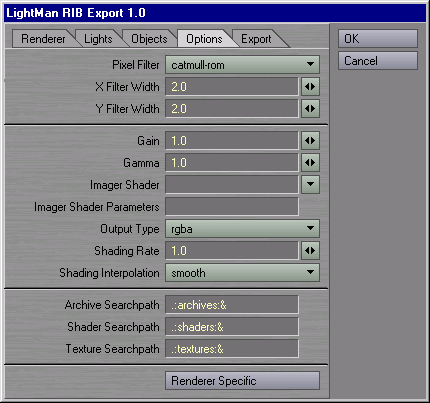
Pixel Filter is the Sampling Filter used by the Renderer. Which filters you can select here, may depend on the Renderer you are using.
The Standard Pixel Filters specified by the RenderMan Spec are box, triangle, catmull-rom, gaussian and sinc. Gaussian is basically a slight blur which is usually successfull to a certain degree in hiding sampling artifacts, Catmull-Rom and Sinc usually produce a crisper image. For the description of these filters and nonstandard filters provided by a certain renderer please consult the manual of your particular renderer.
The Filter Width defines the size or range of influence of the Filter (in pixels). This may have slightly different effects with different filters. In the case of a Gaussian filter a larger value will increase the bluryness.
Gain and Gamma are the usual Gamma correction controls.
You may apply one of the standard Imager Shaders as specified in the RenderMan Interface Specification 3.2 or your own shader and it's Imager Shader Parameters.
Output Type specifies which channels are actually written to the output image file.
The Shading Rate influences how often per pixel Shading Calculation is done. It basically does the same for Shading, what PixelSamples does for Hidden Surface Eliminination. How this is exactly honored is up to the Renderer and may be very different. REYES Renderers (PRMan, RenderDotC) usually use it to estimate how fine the Objects are being diced into micropolygons and has a great influence on Rendering Time and Quality (you might want to use very high Shading Rates for Previews and lower ones for final Rendering. BMRT uses it to decide whether it will reuse Shading Samples within one Pixel. If Shading Rate is 1.0, BMRT will try to make only one Shading Calculation per Pixel, lower values force BMRT to do more Shading Calculations per Pixel. This can have significant Influence on Rendering Time, but usually less significant than for REYES Renderers.
Look up your Renderers Documentation on how Shading Rate influences Rendering Quality and Time.
Shading Interpolation is not always meaningful. In Reyes Renderers it determines, whether the color of a micropolygon is assumed to be the result of the Shading Calculations at one of its Vertices, or whether the Color of all four Corners is interpolated. Usually constant is fine, but it may produce artifacts in some cases, especially when ShadingRate is high.
Archive, Shader and Texture Searchpath are the Searchpath Options passed to the Renderer to let it know, where to look for Shaders, Textures and Archives. You should only edit this, if you use external Shaders, Textures or Archives in your Scene and don't want to copy them to the respective directory LightMan creates. The Syntax is a little bit nonstandard to make sure, that this Options can be used for both, Windows and Unix Systems. The Point tells the Renderer to look into the current directory first, the colons are used for both, seperating entries and for specifying windows drive names. The next standard entry tells the renderer to look in the shaders, textures or archives directory respectively. As an example: If you want to add a directory '../mycustomshaders' to the Shader Searchpath, the line would look like this:
.:shaders:../mycustomshaders:&You should always use forward slashes to seperate directories, if you use backslashes, they must be doubled.
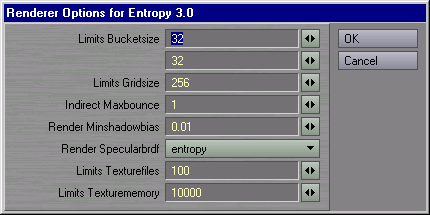
The RenderMan Interface allows Renderers to have nonstandard Options which are specific to a certain implementation. To access these Options for the currently selected Renderer, use the Renderer Specific Button. It will bring up another window with Options, for the meaning of these refer to the Documentation of your Renderer. The picture below shows an example of the Renderer Specific Options Panel for Exluna's Entropy Renderer.
The Export Tab let's you set up the export settings and either export to file for later rendering or render directly with the selected renderer (if it is properly installed on your system).
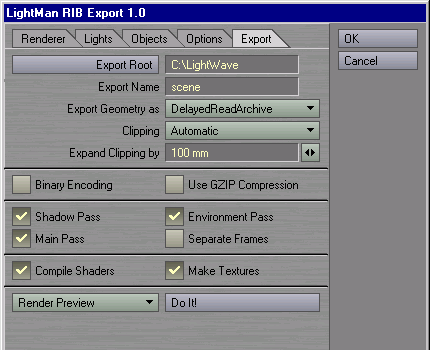
Export Root is the base directory the all temporary files for Rendering are exported to. If needed also subdirectories are created there which contain RIB Archive Files, Shaders and Textures.
Export Name is the base name for the main RIB File.
The Export Geometry as Selector let's you choose how geometric objects are going to be exported.
- DelayedReadArchive is the Standard Choice and usually the best bet. It means that every object is Exported into an Archive and the main RIB File only contains a reference and Bound Information. The object doesn't use any memory because it only get's loaded when the renderer reaches a screen area which contains the bound and the renderer has to assume that the object is visible. Objects which are found to be offscreen or completely occluded are never loaded and for objects which get loaded loading is deferred.
- ReadArchive is like DelayedReadArchive but loading of the objects is not deferred.
- Raw Geometry writes the Objects directly into the RIB Stream and not into external Archives. If objects appear more than once (for example in subsequent frames or in Shadow or Environment Passes) they are completely exported each time which might result in longer export times and a huge RIB file. The upside is, that the whole Scene Geometry is put into one file and not fragmented over a large number of archive files.
- Raw Individual Polygons is similar to Raw Geometry in so far that it exports geometry only to the main RIB file. With this option Polygon Meshes are always broken up into individual Polygons which will result in even bigger files. Some renderers (like BMRT) sometimes have problems with Polygon Meshes. If you're experiencing strange Polygon shapes missing or degenerate Polygons you might want to try this option. It also lifts the restriction that Polygons have to be planar for four-sided Polygons.
Since ASCII scehen descriptions tend to grow very large you can make your RIB files more compact by using Binary Encoding and GZip Compression. These two options can be used individually or together. These options make hand editing of RIB impractical. Be aware that there might be RenderMan Renderers which won't directly read binary or gzipped RIB or both.
Shadow Pass, Environment Pass and Main Pass let's you select which passes actually get put out. This may help for preview Rendering, for example if you don't want Shadow Maps or Environment Maps to be rerendered when you just changed a shader. Light Sources will still make use of their Shadow Maps (and the Renderer may complain when they are not there) so this has not the same effect as disabling Shadow Mapped Shadows.
Separate Frames will write Rendering information for each frame into an individual RIB file instead of one big file.
On the bottom there is a selector box which let's you choose an export mode and the Do It! button which will execute that action. Possible export modes are:
- Render Preview will export RIB for the current frame only and directly invoke the selected Renderer (with output set to framebuffer). This is similar to pressing F9 or selecting 'Render Current Frame' from LightWaves 'Rendering' menu to start the Lightwave Renderer.
- Render Animation will export RIB for the whole range of frames selected in LightWaves Render Options panel and invoke the Renderer (with output set to file). This is similar to pressing F10 or selecting 'Render Scene' from LightWaves 'Rendering' menu to start Rendering.
- Export To File writes the geometry, shaders and textures for the whole animation to Files for later batch rendering.
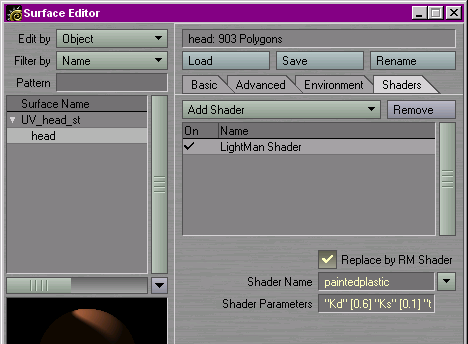
Currently LightMan only exports basic LightWave Surface properties, no textures are exported. For getting textures, you need to write a RenderMan Shader and apply it to a surface using the LightMan Surface Shader as shown below.
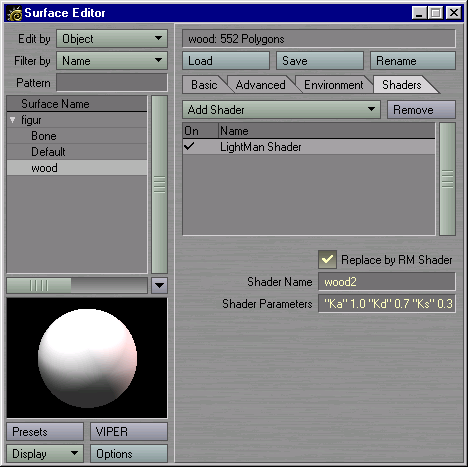
This example uses the
wood2 Shader, which ships with BMRT. You can
switch the replacement on and off with the checkbox in the top, the Shader Name
is wood2 in this case. The Shader is in the file wood2.sl.
Be aware, that a shader name is not neccessarily the name of the file it is in, a
file may even contain more than one shader. The Shader Parameters are a token value
list which uses the same syntax as used in the .rib File. Nonstandard Tokens need
to be inline declared. The whole line in this example is:"Ka" 1.0 "Kd" 0.7 "Ks" 0.3 "specularcolor" [1 1 1] "roughness" 0.1 "float txtscale" 8 "color lightwood" [0.75 0.55 0.40] "color darkwood" [0.69 0.44 0.25]For an deeper understanding of how this works, I recommend reading the RenderMan 3.2 Spec [ 1 ], especially the paragraph describing the Surface call and Section 3 ('Relationship to the RenderMan Shading Language').
You'll also have to put this shader somewhere, where your renderer can find it. One way would be copying it to the shaders directory created by LightMan in your export directory, the other way would be adding the directory where it can be found to the Shader Searchpath on the Export Tab in the Export PlugIn. You'll also have to compile this shader by yourself for preview rendering.
For a good introduction to the concept of Shaders in RenderMan I would recommend the Advanced RenderMan Book [ 3 ] (especially chapter seven) and Steve Mays notes on Shader writing [ 7 ].
With the LightMan Object Replacement PlugIn you can easily replace Objects by calls to RIB Archives, RenderMan Procedural objects, calls to implementation specific geometry or abitrary statements which are put directly into the RIB stream.
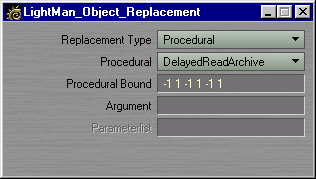
The Replacement Type lets you select by what kind of RIB Statement this object should be replaced:
- ReadArchive directly reads a external RIB file as if the commands in the RIB file were at the place of the ReadArchive Statement.
- Procedural calls one of the Standard RenderMan Procedural Objects. This is a very powerful option, since procedurals are executed when the renderer actually encounters the bound of the procedural while rendering. This means that geometry does not get generated when the bound of the procedural is not seen or completely culled. Exact behaviour depends on the Renderer
- RIB Statement inserts abitrary text into the RIB Stream. Use this only when you are familiar with RIB.
- Geometry uses the RenderMan backdoor to add Renderer Specific Geometric primitives. Consult the documentation of your Renderer for details.
- DelayedReadArchive does basically the same as ReadArchive, but the external RIB File only gets loaded when the Procedural is called when the renderer encounters the Bound while rendering.
- RunProgram calls an external Program which passes geometry to the renderer. The RenderMan Interface Specification 3.2 gives an exact explanation of how to write such programs.
- DynamicLoad does basically the same as RunProgram but not by calling an external program, but loading a Dynamically Linked Library which creates the geometry.
The Argument depends on the Replacement and Procedural Type. For ReadArchive it is the name of the RIB File, for Procedurals it's the argument string passed to the procedural (in case of DelayedReadArchive also the name of the RIB File). For the RIB Statement Replacement, Argument is just the string which is directly inserted into the RIB Stream, in case of a geometry replacement it's the name string of the geometric primitive.
Parameterlist is only used for the Geometry Replacement Type. It's the Parameterlist string passed to the Geometry call (similar to the Shader Parameterlist).
All these things can be really powerful when used effectively. Chapter 5 in the 'Advanced RenderMan' Book [ 3 ] covers a lot of techniques using Procedural Primitives. Some talks of the Siggraph RenderMan Courses [ 6 ] also give a lot of insight on how to use this effectively. The Basic idea is to use some very simple stand-in geometry for interactive editing in LightWave which can effectively replaced by lots of heavy geometry for final Rendering.
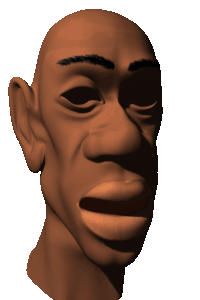
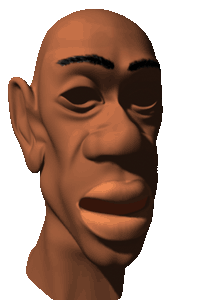 That looks better, doesn't it? But what did we actually do?